Status rules for texts
Status rules can be used to define the text and the text design to be displayed for a specific status.
First of all: Why do you need status rules?

If a device status is assigned to a text field, the status in the text field is displayed exactly as it was programmed for the device, e.g.: If, you want to visualize the status of a window sensor, the displayed text status could be “true”, if the window is closed. Or the status of the color of a LED via text field, the text „#000088“ will be displayed for a dark blue LED color.
Because these very technical status messages are not very useful, it is therefore possible to customize the displayed text by status rules. In addition to the wording, it is also possible to adapt the design of the displayed text.
Create a status rule for texts
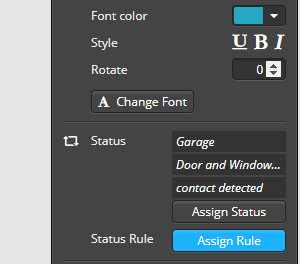
To create a status rule for a text field, select the text field and click Assign Rule in the right-hand property bar.
The status rule settings
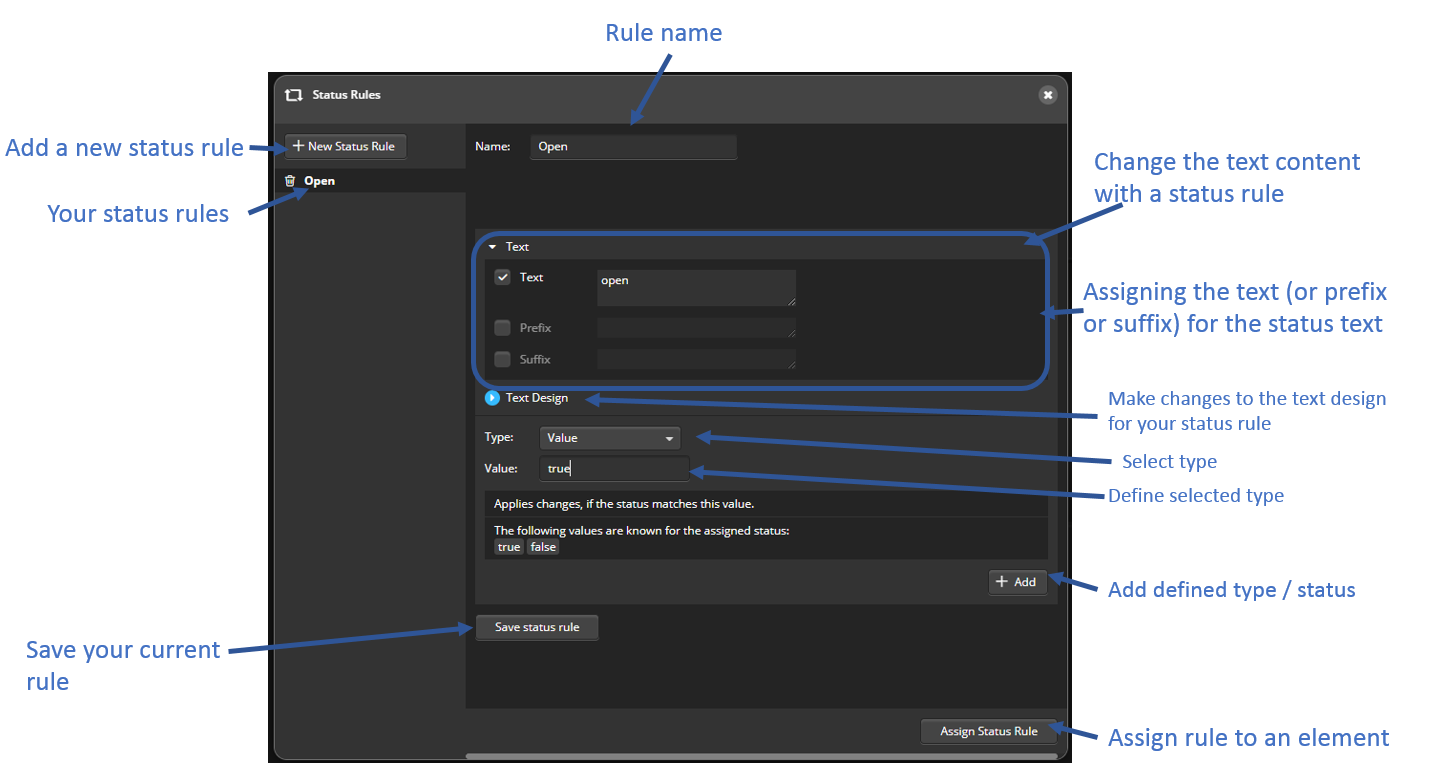
The following image gives you a first overview of the functions. To create a new status rule, click on New status rule and give your rule a name.
Use template or create status rule yourself
There are two ways to create a new status rule:
- create a rule from scratch.
- alternatively, you can use one of the sample templates or a rule that has already been saved and copy it.
Text content or text design: What should be displayed?
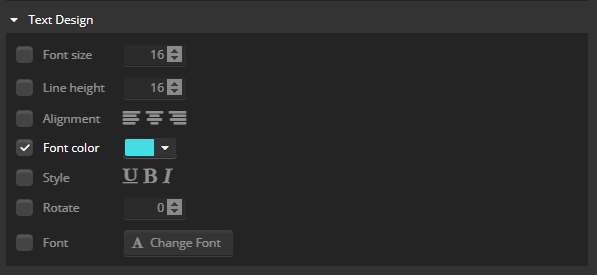

First of all, you now have to determine how the displayed text status should look like. With status rules for texts, you can define changes to the text content as well as changes to the text design. Just open the options for text content or text design.
Under Text you can specify a prefix or suffix in addition to the customized text. Under Text design you can specify the look of the text in more detail (color, font, fontsize,…).
In a status rule you can define both, text content and text design . This way it is possible to display the text “blue” in blue font-color when the LED status changes to „#000088“.
Excursus: The Text-State Pair Principle
Each rule consists of any number of “text-state pairs”. A text-state pair defines which text (or text design) is displayed for which state. A new text-status pair can be added to the status rule using the + Add button when text and status have been entered in the edit fields.
An example
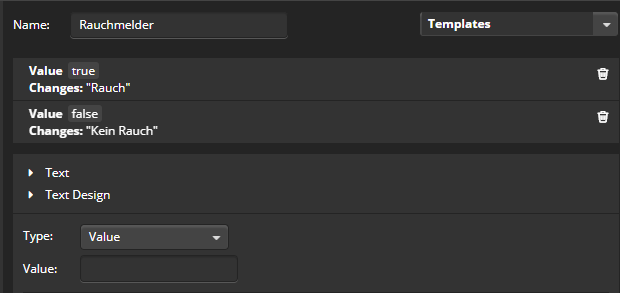
The following image shows an example of the template „Smoke detector“ with two text-state pairs. Instead of false, the German word Kein Rauch (no smoke) is displayed, while instead of true, the German Rauch! (smoke!) is displayed.
Define the status rule: For which status?
After you have named your status rule you can define for the new Text and Textdesign for a specific status, To do this, first determine the status type of the status. The following types are available:
1. value

As a value you can enter a number or a string (e.g. “on”, “true”, “open” etc.) that must be identical to the original (technical) value status. To find out the correct original values of a device to be entered in the value field, the known values for this device are listed below.
2. interval
 To define the interval, you can enter numerical values for the lower and the upper limit. If the status of the the device lies within this interval, the assigned text will be displayed. To make it easier for you to select a suitable interval the known value range is displayed below.
3. set

You can define any number of values (see point 1) as a (status) set, which are linked with each other via an “or” condition. This means: The assigned text is displayed when the device status corresponds to one of the values defined in the set. This can be particularly useful if the same status text is to be used for different devices that report different status values. The original values for the selected device are listed below.
4. Empty text
To define the text to display, if the original device status value is an empty text.
5. Regular expression

To define the text to display, if the original device status value is a regular expression. Regular expression in this context means that the status has one component that is constant and one that is variable.
Example of regular expression.
**Scenario**: Weather service returning as text „Chance of rain at 40% and temperatures up to 24°C“, but for reasons of space you want only „sunny and dry“ or „rainy“ as the status.
The problem: Since both the percentages and the degrees can vary, the types „value“ or „quantity“ can not cover this.
Solution: Regex for „sunny and dry“: „Chance of rain at. [1-3]?[0-9]%“ for rain chances from 0 to 39% - Regex for „rainy“: „rain chance at ([4-9][0-9]|100)%“ for rain chances from 40 to 100%.
→ The expressions check if this text is included in the whole received status text.
The numbers in the square brackets indicate a range „[1-3]“ are the digits 1 to 3, the „?“ behind them indicates that one of of these digits can occur at this point, but does not have to. The „[0-9]“ behind it stands accordingly for a digit from the range 0 to 9, but exactly one must be there. - „([4-9][0-9]|100)“ means: „a digit from 4 to 9“ followed by „a digit from 0 to 9“. Or instead of these two digits, the number 100.
An example for the use of status rules
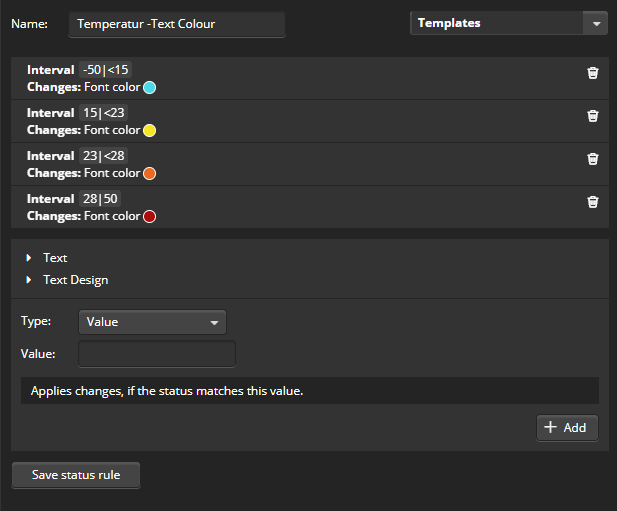
In the given example the text color changes depending on the temperature of a thermostat. Therefor four status intervals were defined with different font colors.
Add text-state pair

Once you have defined your text-state pair, add it to the add it to the status rule with the button + Add. If you have defined all text-state-pairs of your status rule, click on Save status rule.
Edit a status rule
You can edit already saved status rules or templates by selecting them in the list. Now all text-status pairs of this status rule are displayed. If you select one of the text-status pairs, this can be edited in the editing area. By clicking on Apply the changes are saved.
Delete text-state pair
A text-state pair can be deleted via the trash can icon.
Delete status rule
A status rule can be deleted via the trash can icon in front of the status rule in the list.
Copy status rule
You can copy a status rule by selecting the status rule and saving it under a new name.
Assigning a status rule
To assign a status rule for a status display to a text field element, first select this element on the remote page. Now open the text status rule management under properties and select the desired status rule. By clicking Assign Status rule , then rule is assigned to the selected element.
Importing a status rule
Status rules are not created globally for all remotes but for a single remote. To use a status rule from one remote in another one it is possible to import it via main menu under „Remote → Import status rules“. The status rule can also be renamed directly if the current remote already contains a rule with the same name.
For further reading:
 DE
DE